Introduction
I haven’t been able to delve in to the SOC Simulators that TryHackMe offer yet. Most online learning platforms are more tailored for red-team experiences. A vulnerable VM will be spun up for you to attack and retrive flags, wahoo! The blue team side feels like it might take some more resources (I have nothing to back this claim up) and preparation. For a normal CTF you can give a vague note of ‘Get the root flag in /root/flag.txt’ and let the users go wild. They can get creative with their approach if they want.
In a SOC simulation you don’t really want them getting creative. If you offer a phishing email you don’t want them to break in to the sender email (At least I hope that’s not what this room is about). I’m interested in how the SOC Simulator identifies correct answers.
With that, let’s get into this!
Scenario overview
The description of this room is;
Learn how to use SOC Simulator by completing your first scenario. Close all True Positive alerts to pass!
As you may be able to guess this is the first simulator released by THM. The objectives are given to us here to clear up any confusion:
- Monitor and analyze real-time alerts.
- Identify and document critical events such as suspicious emails and attachments.
- Create detailed case reports based on your observations to help your team understand the full scope of alerts and malicious activity.
I’m familiar with the first two objectives. The third one will be a fun challenge though. In my day-to-day I close a lot of phishing alerts. I identify phishing, block senders, clean up mailboxes, all that fun stuff.
What I don’t often do is write reports on it. The most I do is write comments on phishing alerts. I’ve needed to write an incident report a handful of times when a phishing campaign was successful, but thankfully this isn’t a common occurance (touch wood).
When TryHackMe first launched the SOC Simulator the only options were to have an Elastic or Splunk SIEM. Recently though, Sentinel SIEMs have become available. I use Sentinel on the daily which is why I’m jumping in now.
The simulator:
To complete a Scenario, find all the True Positive alerts. Keep triaging alerts until you’ve closed them all!
Once we’ve loaded the simulator up we get a nice looking dashboard (Better than Sentinel) and can wait for alerts.
And wait…
A little bit more waiting…
Maybe some more?
… And wait…
And after 20 minutes I thought something might be wrong. This scenario should only take 10 minutes according to the overview. Waiting 20 minutes for an alert to come through feels wrong.

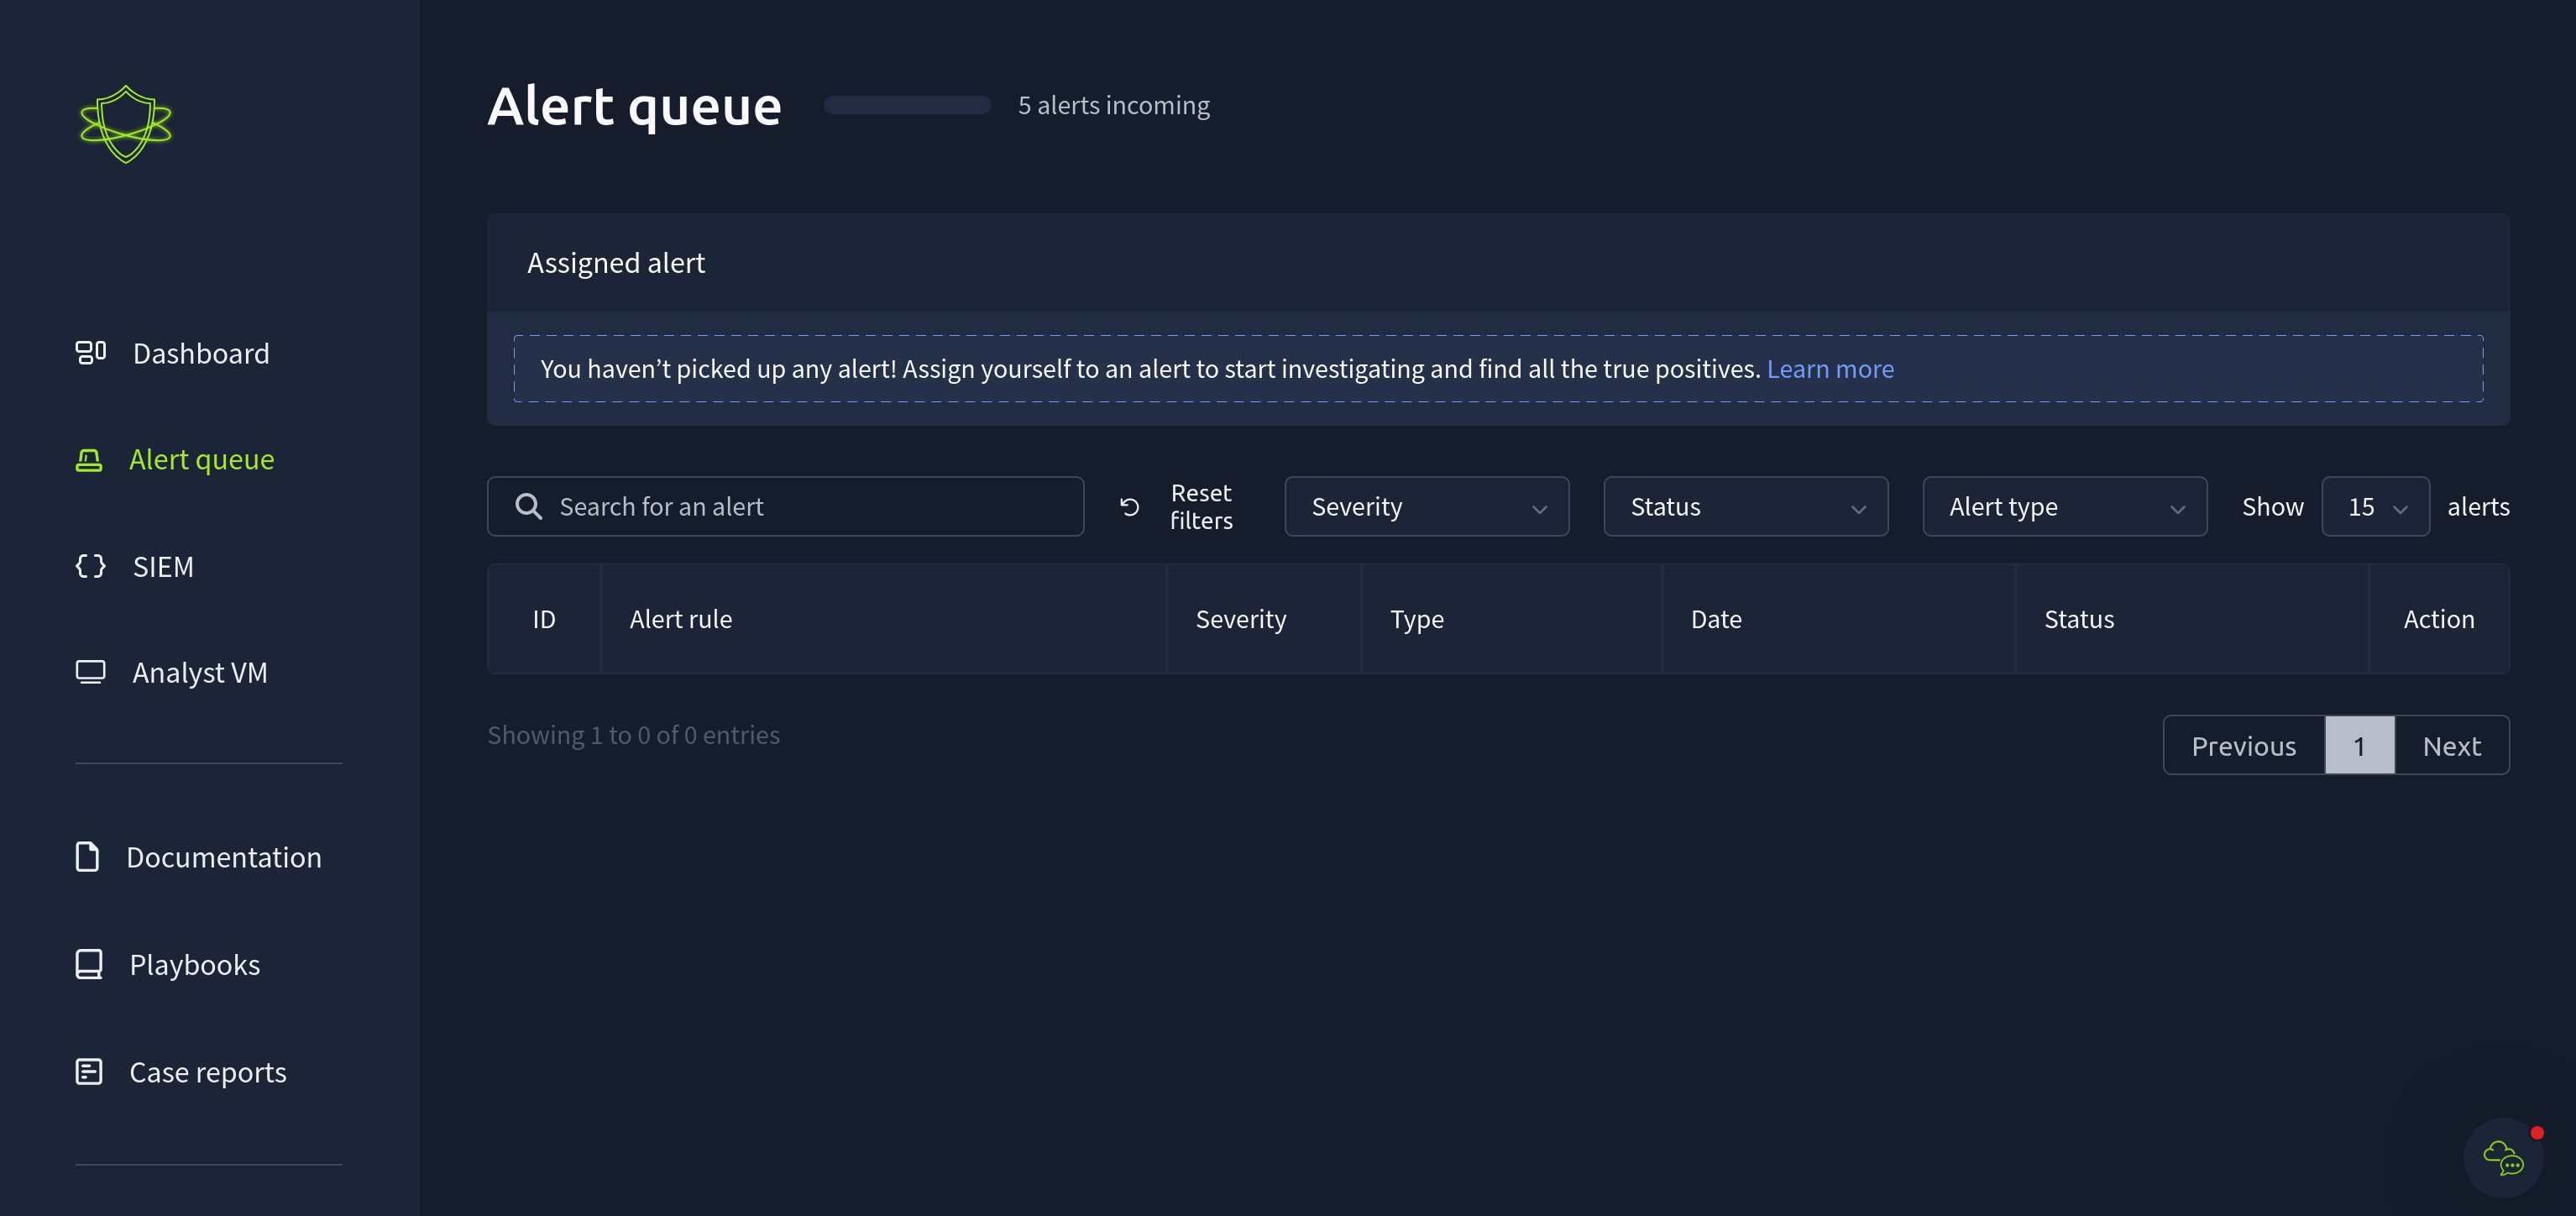
I decided to restart the scenario two more times and still didn’t get any alerts coming through. The ‘alert queue’ was even showing 0 incoming alerts.
I changed to a Splunk room, and the alert queue was showing 5 incoming alert. So I guess no Sentinel for me today.
Admittedly my Splunk knowledge isn’t too good. I’ve used it before and it’s similar enough to Sentinel that I can use it comfortably. It’s just a little bit annoying that I can’t use sentinel. Ah well!
Splunk time
As I mentioned above my Splunk knowledge isn’t the best. In my day-to-day I use Sentinel, but Splunk and Sentinel (And most SIEMs) use pretty similar syntax. KQL (Kusto Query Language) is just SPL (Search Processing Language). The only big difference (in my opinion) is navigating the UI. Sentinel has a lot of extra Azure components to it, whereas Splunk feels a little less cluttered.
So I completed a few Splunk rooms and checked the doccumentation, then decided I was comfortable enough to jump back in.
So where were we…
The first alert
Now that we’re using Splunk it seems to be working!
Looking at the alert queue tab I can see that 5 alerts are on their way in:
After about 5 minutes the first alert comes through:
Our first step here is to assign the alert to ourselves. In a real SOC setting this makes sense, you don’t want to be 10 minutes into an alert only to find your colleage has picked it up and was already writing resolution notes. Assigning yourself onto alerts also helps if any auditing needs to be done. If a phishing email turns into a BEC (Business Email Compromise) that requires a full report of what happened, who was involved, at what time, etc, then assigning yourself to an incident will give you a clear audit trail.
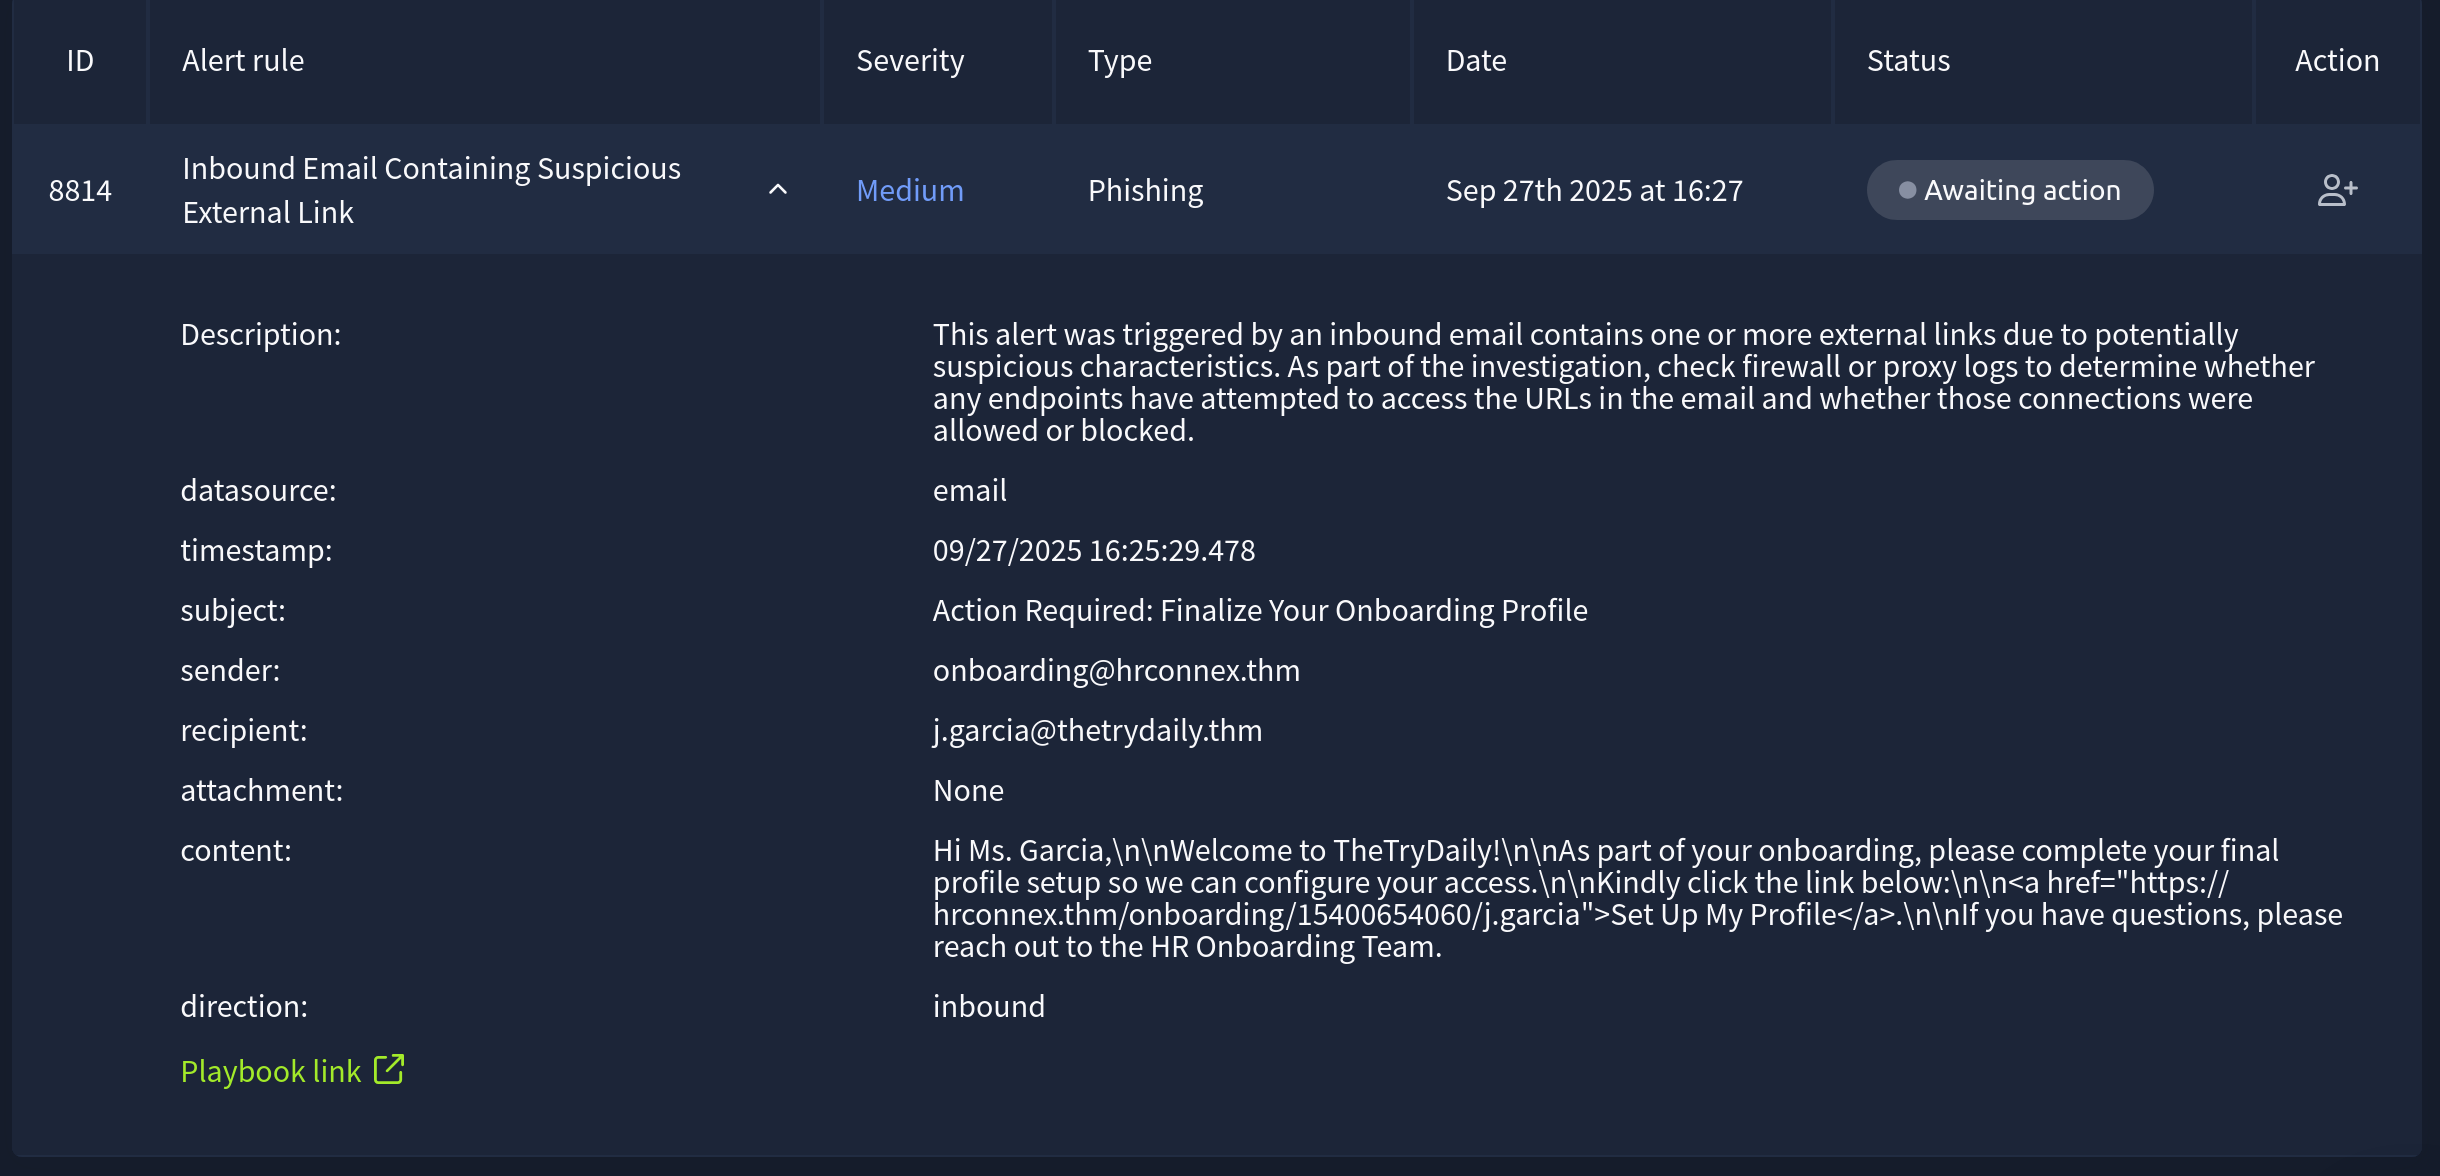
Here’s a quick description of the alert, the same text we can see above:
This alert was triggered by an inbound email contains one or more external links due to potentially suspicious characteristics. As part of the investigation, check firewall or proxy logs to determine whether any endpoints have attempted to access the URLs in the email and whether those connections were allowed or blocked.
This is a pretty generic description, but it’s similar to something you’ll see. From my Sentinel experience I know that most alerts have a little description similar to the above. It’s nice to see!
The subject line: Action Required: Finalize Your Onboarding Profile already seems suspicious to me. Some of the red flags for phishing email are a sense or urgency. There’s no explicit time given in the subject alone, but this is already starting to set alarm bells ringing (Or I’m just paranoid, and know that some of these alerts will be true positives).
Let’s look at the other fields available to us solely in the alert. It’s not that common to be able to resolve an alert from the information given in it alone. Sometimes you will have to dig through endpoint or network logs:
sender: onboarding@hrconnex.thm

recipient: j.garcia@thetrydaily.thm

attachment: None

content: Hi Ms. Garcia,\n\nWelcome to TheTryDaily!\n\nAs part of your onboarding, please complete your final profile setup so we can configure your access.\n\nKindly click the link below:\n\n<a href="https://hrconnex.thm/onboarding/15400654060/j.garcia">Set Up My Profile</a>.\n\nIf you have questions, please reach out to the HR Onboarding Team.

direction: inbound
In this scenario our company is TheTryDaily. This matches with the Recipient and Direction fields.
The sender field is, obviously, the sender. Some companies will outsource their HR department so this isn’t immediately cause to mark this as a red flag. However it is important to note that they are an external sender.
For the content of the email we can see that the link they reference does indeed go to hrconnex.thm, the same domain as the sender. This gives the email a little bit more credibility.
However, we don’t know where the link goes. It’s not impossible to find someone who has just joined a company. I’ve personally seen a lot of company LinkedIn pages celebrate and repost when someone has just joined the company. This is a great way to make someone feel welcomed, but also opens them up to being sent spear-phishing emails like the one we’re analyzing.
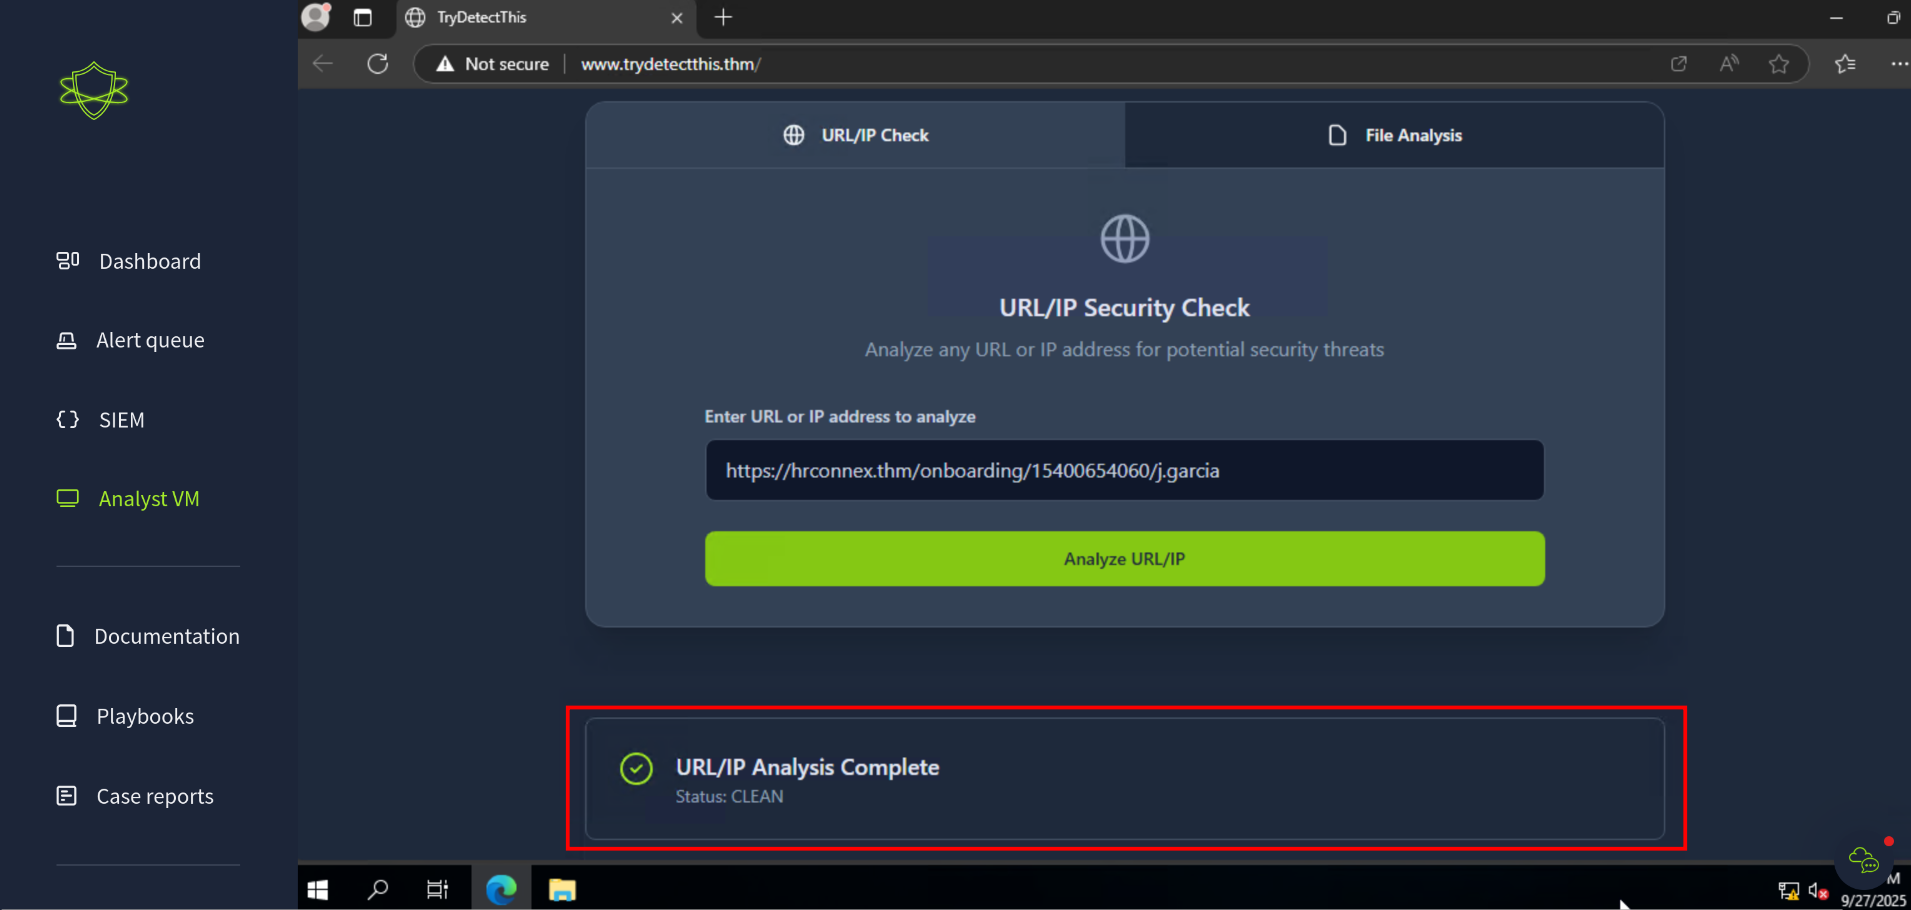
So let’s load up the Analyst VM and go to that link. Usually I would use something like browserling or urlscan to check URLs, but as these websites don’t actually exist we’ll need to use the Analyst VM!
In the Analyst VM we have access to TryDetectThis.thm, a fake website that is used like VirusTotal, or other sites to check domain and file reputation. More on this later. For now we can enter the domain and get a response back if this is a legitimate site or not:
Now we can write the case-report for this incident. In my CTF write-ups I don’t include flags. You’re not really learning anything if you just copy and pasting answers. The point of TryHackMe is to learn, not to just search for answers. Sometimes you will need to do some research, but you’ll always be able to find answers yourself.
All that to say I will not be adding my case-reports to this write-up. You’ll just have to do it yourself!
Task two…. Alert two, I mean
In the time it took me to write all of task (email?) one up, every other alert came through. Woo!!
Obviously in a real SOC scenario you don’t need to write a flow of consciousness style blog post for every alert, thankfully. I took a lot longer to write up task/email/alert one, so we’ll just pretent that the second email has just come through.
Kind of.
I saw that a High severity alert came through, so instead of going in chronological order we’ll go for that first. Some SOCs will have different SLAs on how quickly they will respond to High severity incidents. At an MSP this can vary by the client and the SLA they’ve signed. Either way; We’ll take that High severity alert first.
The alert title; Access to Blacklisted External URL Blocked by Firewall, seems pretty bad, so let’s take a closer look at it and see all the details:
Description: This alert was triggered when a user attempted to access an external URL that is listed in the organization's blacklist or threat intelligence feeds. The firewall or proxy successfully blocked the outbound request, preventing the connection. Note: The blacklist only covers known threats. It does not guarantee protection against new or unknown malicious domains.

datasource: firewall

timestamp: 09/27/2025 16:27:52.478

Action: blocked

SourceIP: 10.20.2.17

SourcePort: 34257

DestinationIP: 67.199.248.11

DestinationPort: 80

URL: http://bit.ly/3sHkX3da12340

Application: web-browsing

Protocol: TCP

Rule: Blocked Websites
Once again we get the generic alert description which gives us an overview of the alert. Good stuff.
The main fields that we need to look at are DestinationIP and URL. The URL tells us that this is a [bit.ly] link, the link shortener.
Time for a quick aside; If you add a ‘+’ to the end of a bit.ly link you’ll be shown where the link is redirecting you to. The link will remain on bit.ly and you have the chance to see where it actually goes. This can be useful to make sure that random links you’re sent aren’t just going to grab your IP (or any other device information), or go to an adware site.
I added a ‘+’ to the end of the link and got a 404. This was kind of expected, but more on that in a bit.
For now we want to write our case report for this alert. We know that it is a True-Positive, because Bitly was in the ‘Blocked Websites’ rule for the firewall, but we need a bit more information before we can finish the report.
Like in the previous task I won’t be pasting my answer, but the prepopulated report gives you some helpful hints in what to look out for:
Time of activity:

List of Affected Entities:

Reason for Classifying as True Positive:

Reason for Escalating the Alert:

Recommended Remediation Actions:

List of Attack Indicators:
For the ‘Affected Entities’ we want to get all the internal entities that were involved in this incident. The alert source (the firewall) doesn’t give us the username or hostname of the device where this request came from which is a bit unfortunate.
Usually in these circumstances I would try to get this information. From the SIEM we can search for the source IP and correlate that with other requests that do contain the Hostname and Logged in user. This information makes it a lot easier to remediate the alert by knowing which user to reach out to and gain further clarity on the events surrounding the alert.
Earlier I mentioned adding a ‘+’ to the [bit.ly] links to show where they redirect to. Most URL shorteners do this so it’s good practice if someone ever sends you a link out of the blue. In saying this though I would never open a suspicious URL on my host machine. UrlScan and Browserling are some of the tools I use the most often, I highly recommend them!
For now we can just fill in the information in the template above and close this off. Onto the next!
Alert three
At this point the room had approached the three hour mark.
 Taking an hour and a half for an alert is awful, but I was writing this post and had other things inbetween to do, but more on my overall thoughts later on!
Onto alert number three. Here’s the description and alert body:
Alert name: Description: Inbound Email Containing Suspicious External Link

Description: This alert was triggered by an inbound email contains one or more external links due to potentially suspicious characteristics. As part of the investigation, check firewall or proxy logs to determine whether any endpoints have attempted to access the URLs in the email and whether those connections were allowed or blocked.

datasource: email

timestamp: 09/27/2025 16:26:38.478

subject: Your Amazon Package Couldn’t Be Delivered – Action Required

sender: urgents@amazon.biz

recipient: h.harris@thetrydaily.thm

attachment: None

content: Dear Customer,\n\nWe were unable to deliver your package due to an incomplete address.\n\nPlease confirm your shipping information by clicking the link below:\n\nhttp://bit.ly/3sHkX3da12340\n\nIf we don’t hear from you within 48 hours, your package will be returned to sender.\n\nThank you,\n\nAmazon Delivery

direction: inbound
Thankfully this one is a lot easier than the previous two.
Phishing emails can have a few big things to look at first. In this specific example the sender address and the URL within the content of the email are big red flags. Amazon.biz is not a legitimate Amazon domain (Actually, it is. Amazon does own this domain but this is not their usual account that they email from. This could be spoofed domain in a real setting.). The URL in the content of the email is highly suspicious though. Amazon will always send internal amazon links for tracking details.
Alert four
Once again we’ll grab another alert. Assign ourselves and start digging into the details.
Speaking of details, here’s the alert we’re looking at next:
Rule name: Inbound Email Containing Suspicious External Link

Description: This alert was triggered by an inbound email contains one or more external links due to potentially suspicious characteristics. As part of the investigation, check firewall or proxy logs to determine whether any endpoints have attempted to access the URLs in the email and whether those connections were allowed or blocked.

datasource: email

timestamp: 09/27/2025 16:28:56.478

subject: Unusual Sign-In Activity on Your Microsoft Account

sender: no-reply@m1crosoftsupport.co

recipient: c.allen@thetrydaily.thm

attachment: None

content: Hi C.Allen,\n\nWe detected an unusual sign-in attempt on your Microsoft account.\n\nLocation: Lagos, Nigeria\n\nIP Address: 102.89.222.143\n\nDate: 2025-01-24 06:42\n\nIf this was not you, please secure your account immediately to avoid unauthorized access.\n\n<a href="https://m1crosoftsupport.co/login">Review Activity</a>\n\nThank you,\n\nMicrosoft Account Security Team

direction: inbound
Like with the previous alert, we can resolve this all from the information within the alert. No need to further probe for details in the SIEM.
The first thing that jumped out to me here and caused me to mark this as a true-positive straight away was the sender address.
Unusual sign-in attempts to a Microsoft account would be sent, no surprises, from a Microsoft domain. The domain in the sender address field is a pretty poor typosquat of Mircrosoftsupport.co (Which in itself isn’t a microsoft domain and has been suspended by the hosting platform).
We can fill out the same template as above. As I mentioned we don’t need to dive deeper for further information in the SIEM. We can get all the required information from the alert itself.
Once we submit this, we’re done!
Conclusion
The screen immediately changes to the below page:
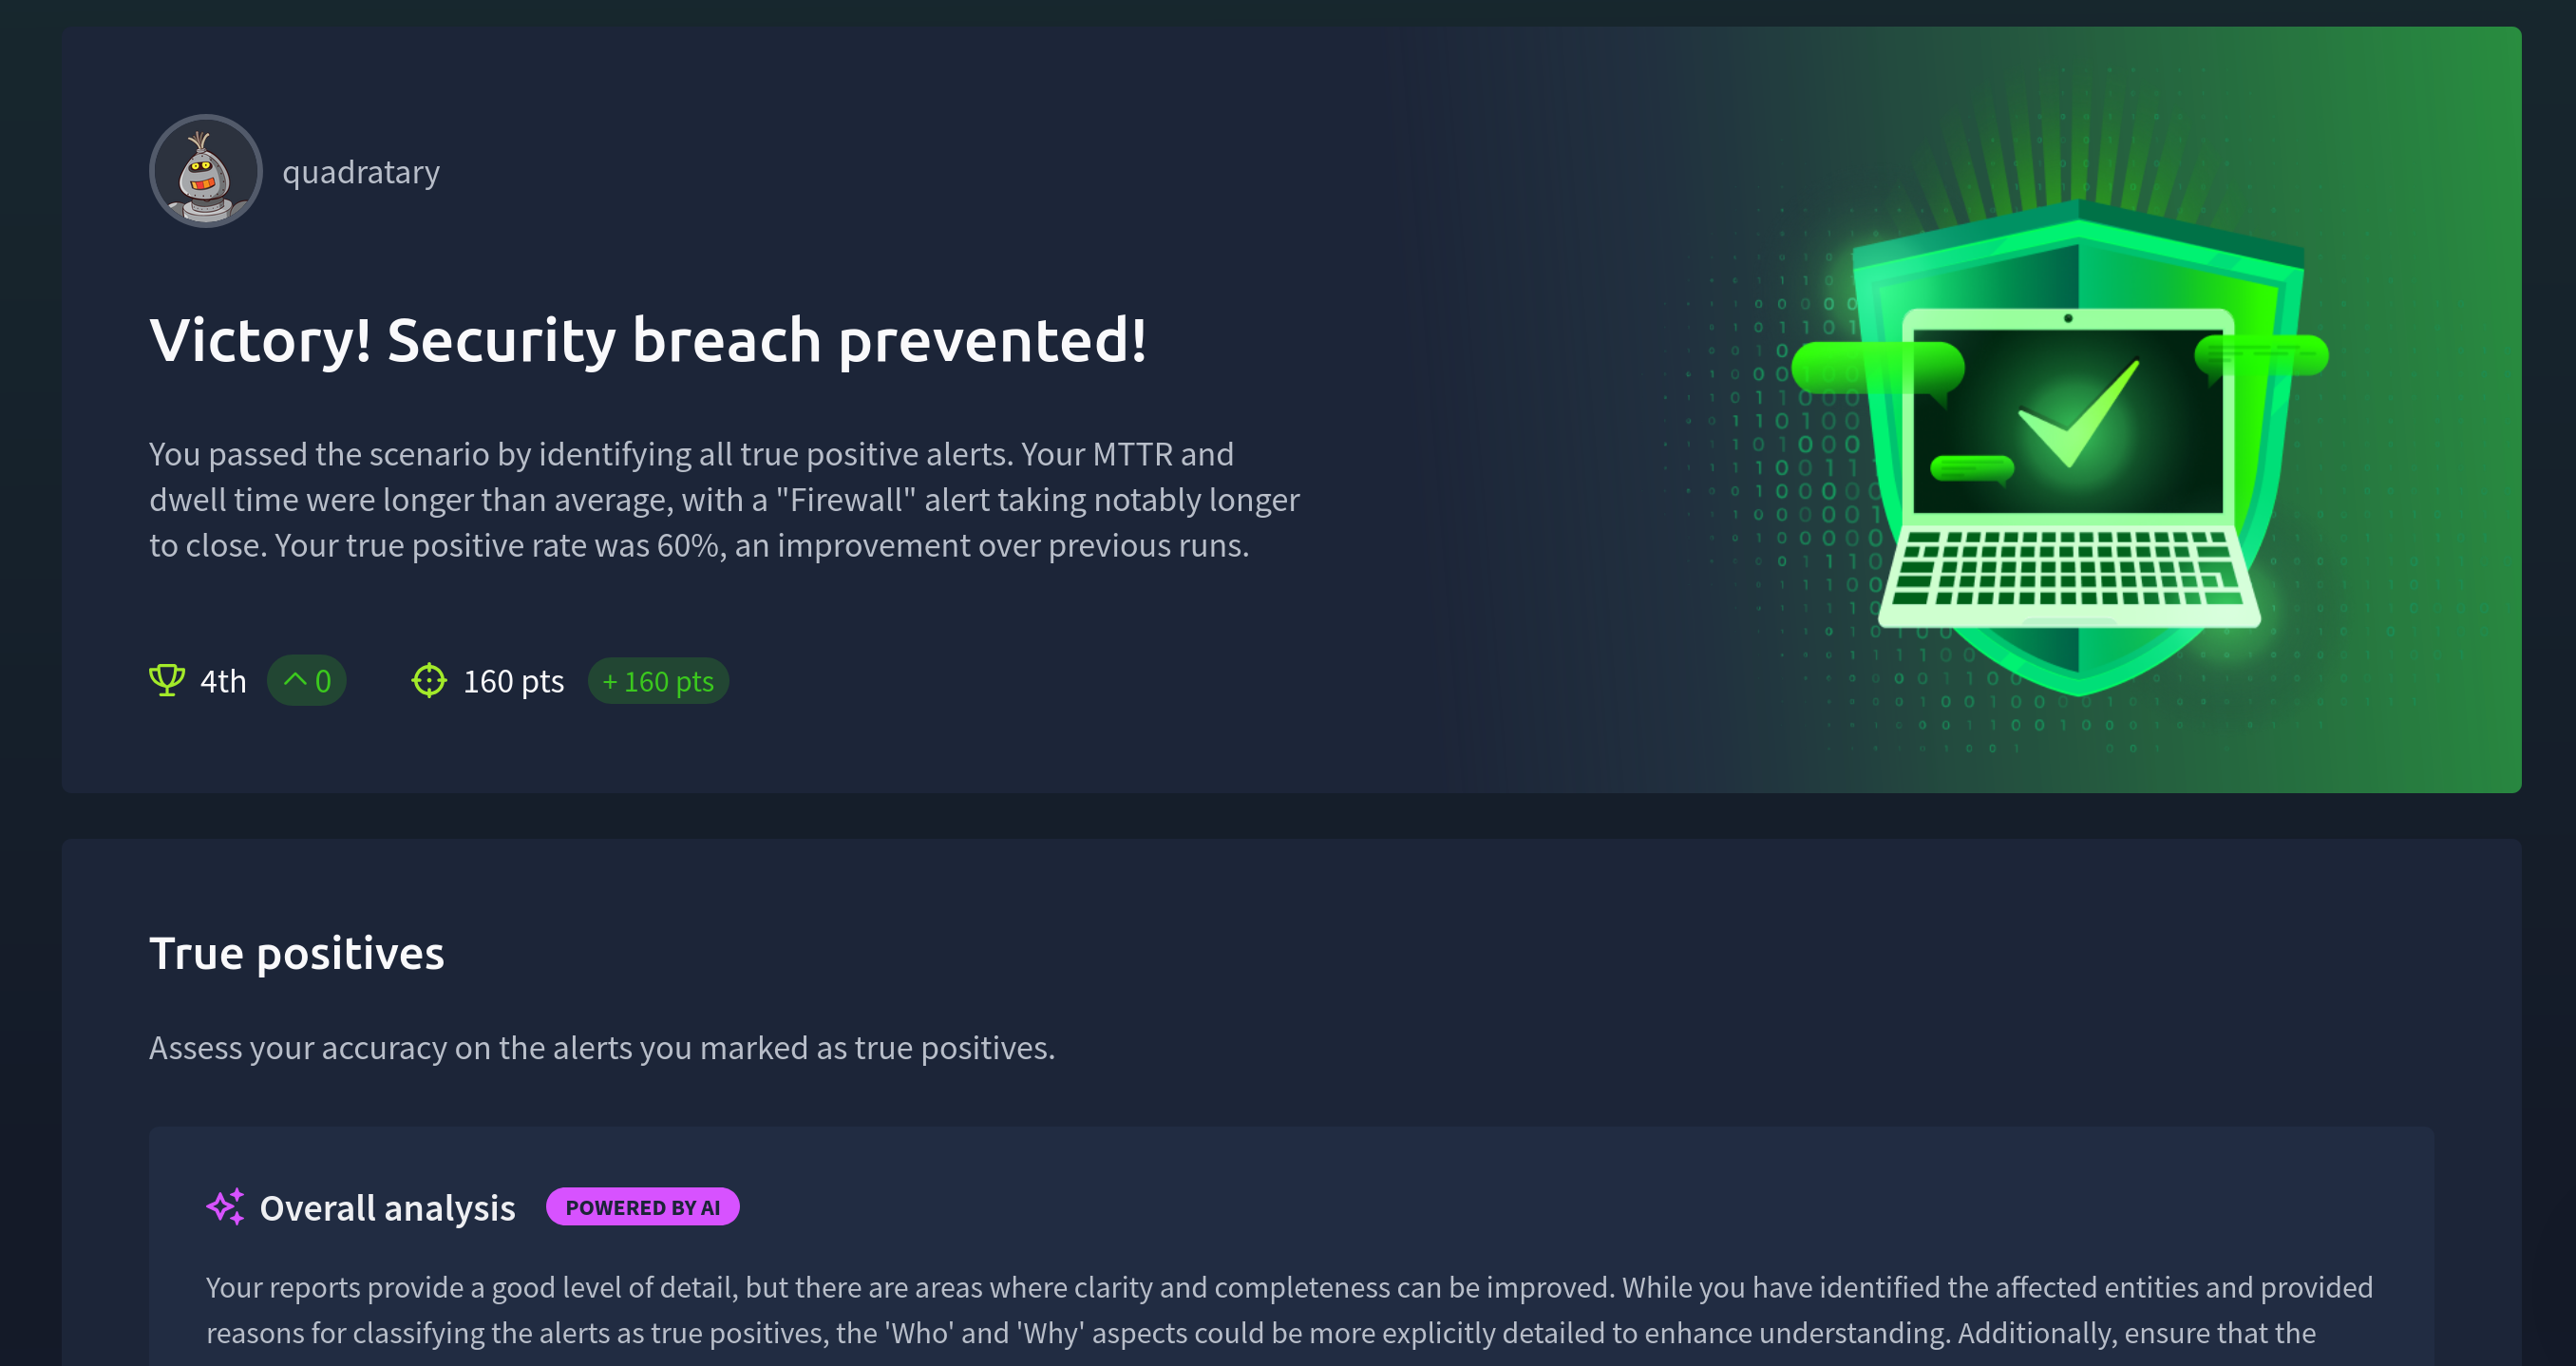
We get a nice review screen that shows the status of each alert we’ve reviewed. Here are the true positives:
 Obviously the high alert taking 131.47 minutes is atrocious. This is definitely something that would be a major red flag if this was a real SOC. As I have mentioned in previous posts though, I often write these posts as I’m doing the tasks, taking screenshots and editing myself takes a while. I’m not too upset about the time these alerts took. As long as they’re correctly identified I’m happy.
For the single false positive we also get a little section on this:
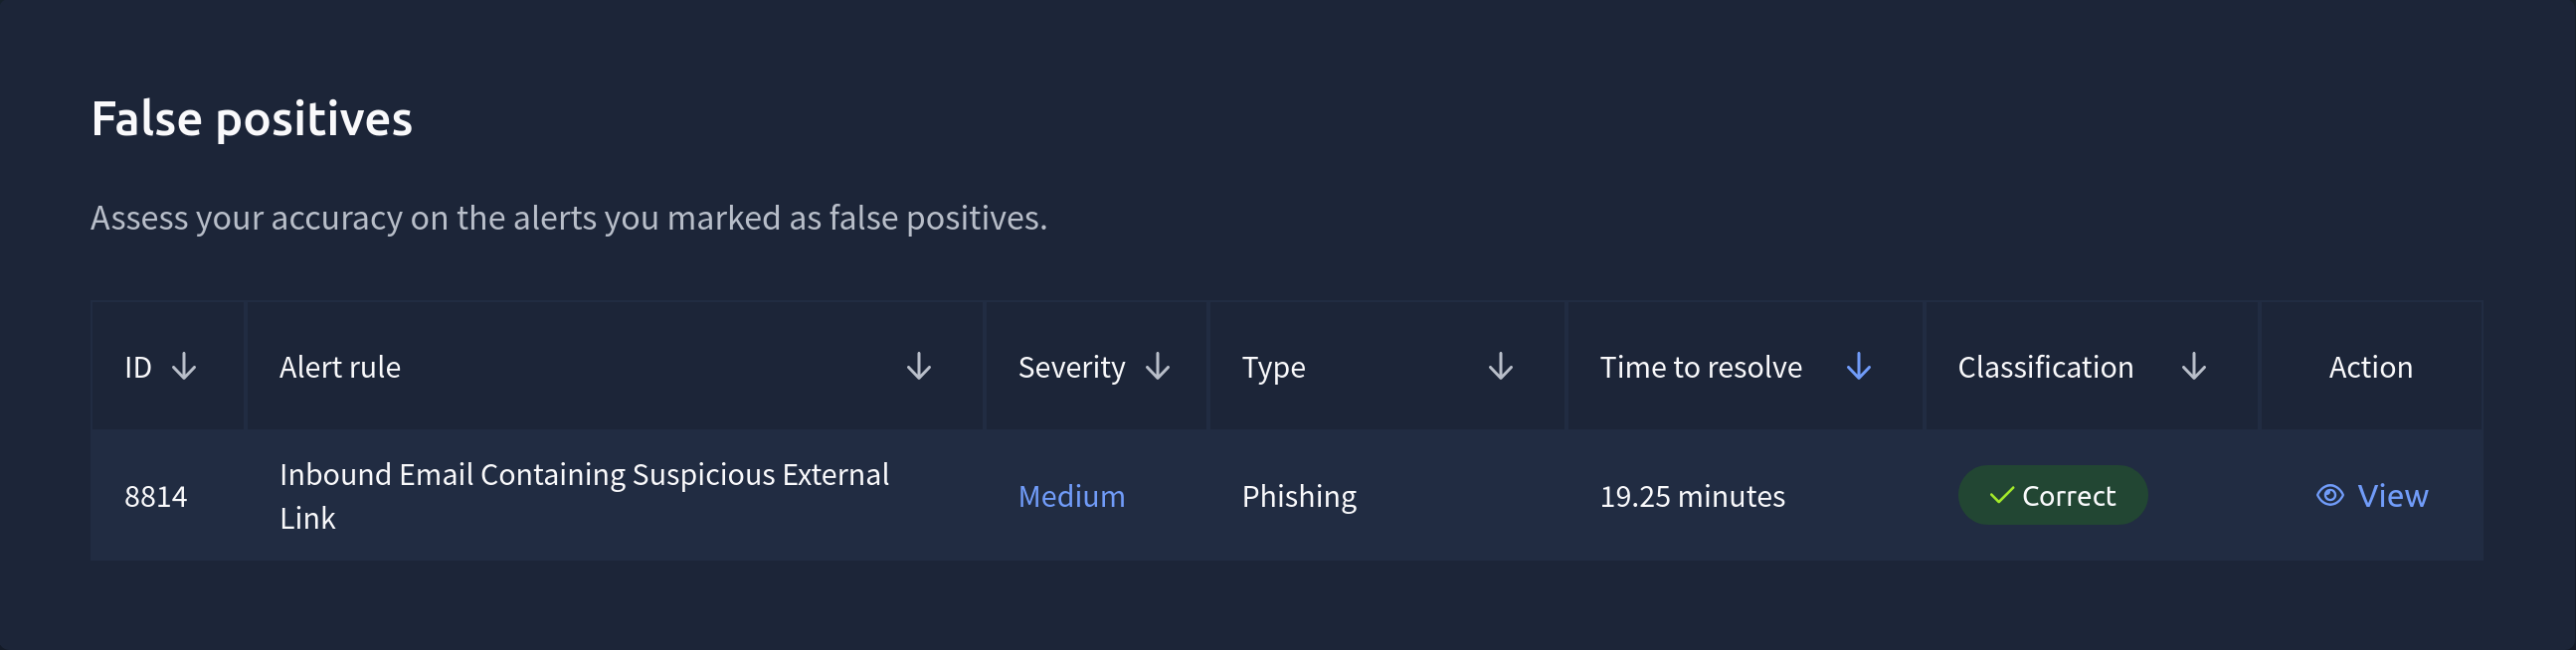 … And that was correct too. Yay!
Improvements to be made if I did this again would be to focus on adding the 5Ws to my incident reports,the ‘What’, ‘When’, ‘Where’, ‘Who’, and ‘Why’ should all be included in the reports. These are good things to add (And in my opinion should be in the template, but it’s a good learning experience). I’m not too fussed about the scores here. I can redo this and take all these recommendations on.
In the section for the first alert I mentioned the faux-site TryDetectThis being a replacement for VirusTotal. While it’s good to have this tool in a SOC Simulator I think it’s also dangerous to give the appearance of the results always being correct. If you scan a freshly created Phishing site in VirusTotal it will give you a clear result. If no one has flagged it before, or it uses a unique phishing page, then none of the seucrity vendors will pick up on it and flag it. I think it’s important to note that while VirusTotal and other similar sites are useful, you can’t trust them with complete certainty. Sometimes you need to trust your gut and make a decision.
Ultimately I really enjoyed this simulator. I never really needed to use Splunk for anything so I could have done this with the Sentinel-on-the-fly instances if I really wanted. Other SOC Simulator scenarios do deal with using the given SIEM to delve further into an alert and detections.
It’s a good tool to use if you haven’t had hands on experience before in a SOC environment. With the addition of Sentinel instances it’s an amazing resource to use if you want to add experience to a CV without having the time or ability to add it otherwise.
Thanks for reading! I’ll be doing a few more of these as I get them done, so stay tuned!