Analyze network traffic for LLMNR/NBT-NS poisoning attacks using Wireshark to identify the rogue machine, compromised accounts, and affected systems.
When I first saw this lad and the description I was a little confused what LLMNR and NBT-NS poisoning attackers were. I’m familiar with poisoning attacks like ARP and DNS, but the LLMNR and NBT-NS protocols didn’t ring a bell for me. A lot of cybersecurity is research and understanding concepts, so I was happy to jump into this lab from CyberDefenders and learn something new.
Scenario Overview
Your organization’s security team has detected a surge in suspicious network activity. There are concerns that LLMNR (Link-Local Multicast Name Resolution) and NBT-NS (NetBIOS Name Service) poisoning attacks may be occurring within your network. These attacks are known for exploiting these protocols to intercept network traffic and potentially compromise user credentials. Your task is to investigate the network logs and examine captured network traffic.
Now we know what LLMNR (Link-Local Multicast Name Resolution) and NBT-NS (NetBIOS Name Service) poisoning is. Or at least we have more of an understanding on them than we had before. It’s a small start, but we can go further if we need to later on.
Spoilers, we don’t really go into much more detail on what these protocols do or what they’re used for. If this was a harder lab I would highly suggest taking some time to study the protocols and understand what they are used for, potentially even understand some common attacks that target these protocols.
The evidence we have for this incident is all contained in a .pcap file. We need to access this through a virtual machine. It would be nice to have just been given the .pcap to analyze ourselves, but I’m not going to complain about a VM with WireShark pre-loaded onto it.
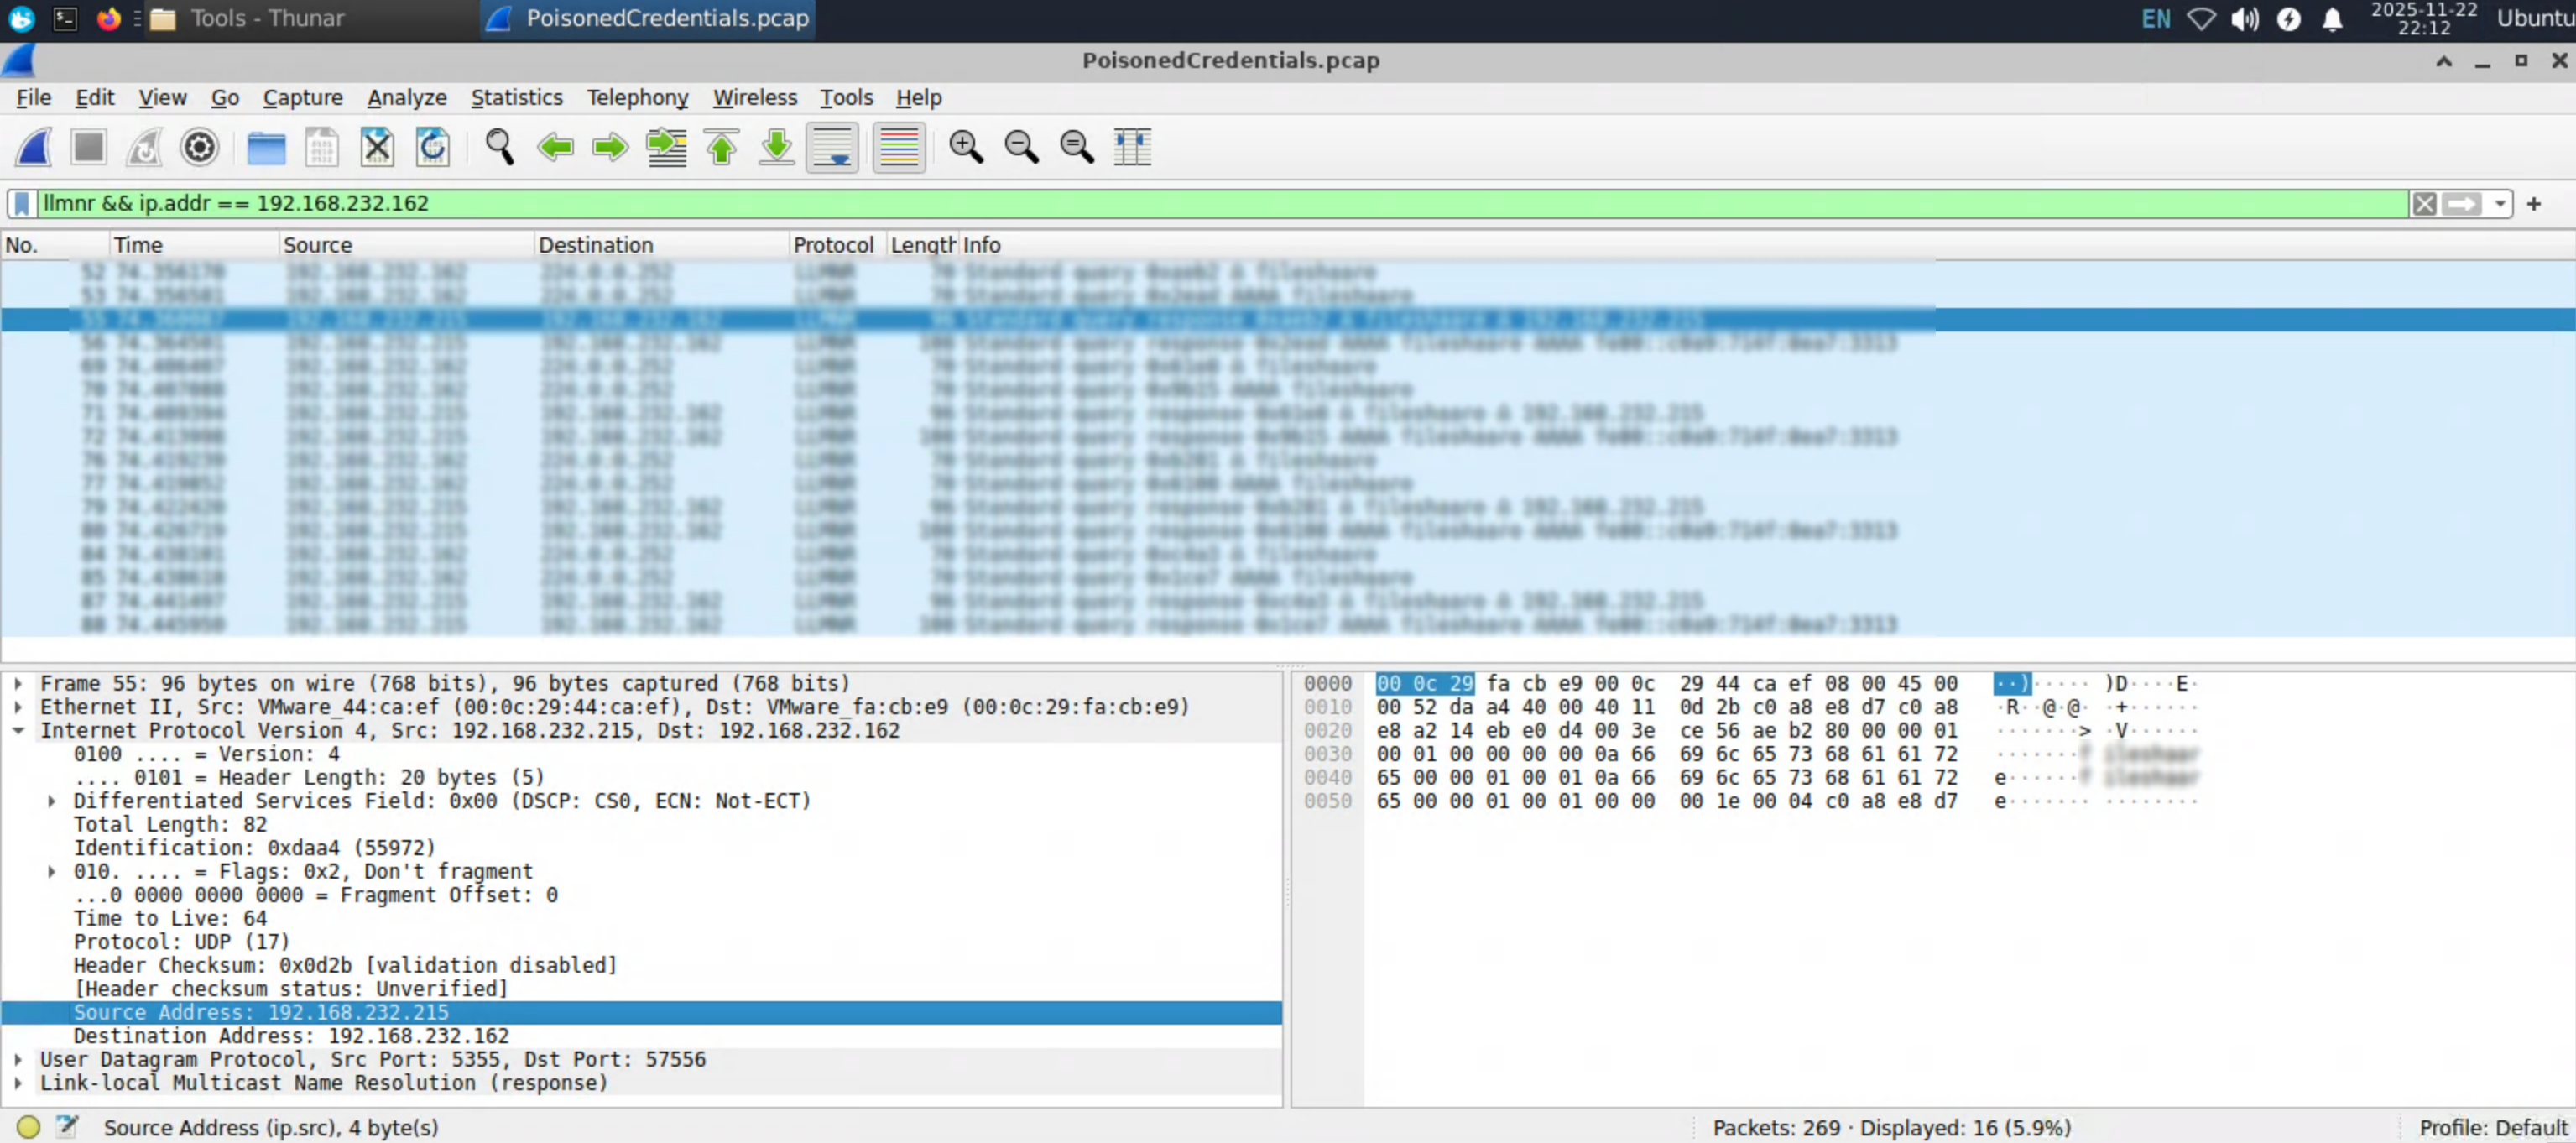
Question One
In the context of the incident described in the scenario, the attacker initiated their actions by taking advantage of benign network traffic from legitimate machines. Can you identify the specific mistyped query made by the machine with the IP address 192.168.232.162?
We can add just the IP address to our filter in WireShark, but after taking a quick look at the first hint we get a much more concrete idea of the filter to add. Heere’s the hint:
Focus on LLMNR queries from the IP address 192.168.232.162. Have you filtered the network traffic in Wireshark to only show this specific traffic type?
The filter I used for this was llmnr && ip.addr == 192.168.232.162. We can quickly see the mistyped query below:
Like in previous posts I’ll be blurring out the answers. I’ll write a more in-depth post about why I blur the flags out later on, for now we can move on to Question Two!
Question Two
We are investigating a network security incident. To conduct a thorough investigation, We need to determine the IP address of the rogue machine. What is the IP address of the machine acting as the rogue entity?
We can use the same filter as we used in the above question (llmnr && ip.addr == 192.168.232.162) and see the source IP address. This is (obviously) different from the IP address we’re adding to the filter. This is the IP address which has initiated the LLMNR poisoning attack.
It’s possible that the attacker has compromised the endpoint and is using it to launch these protocol poisoning attacks. It’s also possible that there is a malicious insider doing all this.
We’ll just have to keep looking to find out!
Question Three
As part of our investigation, identifying all affected machines is essential. What is the IP address of the second machine that received poisoned responses from the rogue machine?
At this point we have two IP addresses. The original IP from the first question with the mistyped query: 192.168.232.162, and the second IP which we identified in Question Two as being used maliciously to conduct the LLMNR poisoning attack.
For our display filter we can make a small adjustment to target the second, malicious IP address as a source, and LLMNR for the protocol: ip.src == 192.168.***.*** && llmnr
The results will show us 192.168.232.162 from above, as well as a new IP address which received poisoned LLMNR responses from the source IP in our display filter. That new IP is the answer!
Question Four
We suspect that user accounts may have been compromised. To assess this, we must determine the username associated with the compromised account. What is the username of the account that the attacker compromised?
At this point we have solely been looking at the LLMNR protocol. NBT-NS is mentioned in the scenario overview so I figured it would be safe to assume we’d be applying a filter for this protocol in this question. I was left scratching my head for a while on this question until eventually taking a look at the first hint for this question;
To identify the compromised username, apply the filter ntlmssp.auth.username. This will help locate packets containing NTLM authentication data, revealing the username associated with the compromised account.
Alright. We can do exactly that and apply the filter ntlmssp.auth.username.
There’s only one packet that’s displayed here which pretty clearly shows the answer. The wording of this question also answers some lingering ideas I had back in question two. It’s confirmed for us now that the account (which we now have the username of thanks to the filter we got from the hint) has been compromised.
Question Five
As part of our investigation, we aim to understand the extent of the attacker’s activities. What is the hostname of the machine that the attacker accessed via SMB?
I solved this in an odd way. Still using the same filter as above we can follow the TCP stream for the packet. It might take some time to parse the information as it’s formatted but you’ll eventually see the hostname of the device that’s been compromised. You’ll see the domain (*****.local) after the string, but bare in mind that every character will be separated with a period when viewing the stream this way.
That’s one way to get the answer. I checked the hints for this question to confirm what the intended method would be. The second hint gives us the best information:
Use the filter ntlmssp.challenge.target_info to locate relevant packets. Then, examine the SMB2 header and search for the field NetBIOS Computer Name to identify the hostname of the machine accessed by the attacker via SMB.
To get the hostname in the intended way we can use the filter ntlmssp.challenge.target_info, then check the SMB2 header details. Either way, we find the hostname of the compromised endpoint and our answer.
Conclusion
Another neat little lab from CyberDefenders! I mentioned that I didn’t recognize the protocols mentioned in the scenario overview. I still don’t have much of a grasp on what they are or how they’re used. I’m happy getting any hands-on experience with WireShark!